EarCutter FX - Vētra
This is a hobby / passion project to expand my favorite drum machine by adding additional features not present on the unit.
These will be driven from an external hardware device that will be rebuilt onto the Perkons enclosure.
This is intended as a learning experience while I grapple with some new workflows across multiple disciplines such as:
UX / UI Feature and Layout Design
PCB and Electronics Design for MCUs
Embedded Software ( I have the least experience here. )
Enclosure Design and Fab ( I have the most experience here. )
Vētra User Guide - This is "TFM"
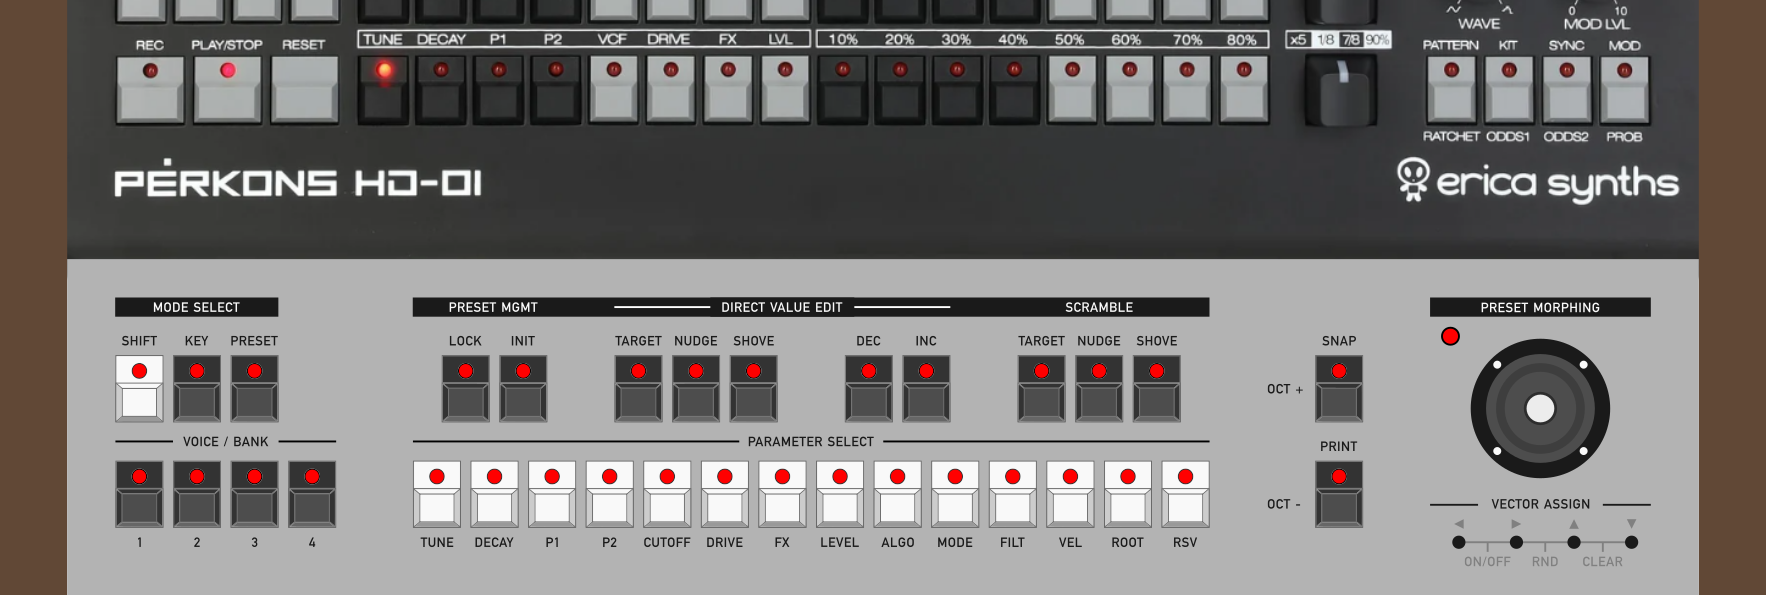
Erica Synths HD-01 Perkons Expander
Overview
Latvian for Storm, Vētra serves as a container for the Thunder of Erica Synth's Perkons HD-01.
Vetra expands on Erica Synth's Perkons HD-01 in a number of ways.
At its core, I developed Vetra as a sound design utility. A way to arrive at, archive and explore unique sounds per voice. While unique performance implications will emerge, they are not the primary aim of this project.
Key Features
- 5 Octave, 24 Key Note Entry Mode
- Preset Mode with 96 slots per voice
- Parameter Modifiers, and Realtime Morphing
Key Mode
In Key Mode, Vetra is a 5 octave, 24 key midi note input device for the Perkons with OCT + and − buttons.
The Octave Button LEDs will display the current octave.
Key Mode — Shift Held
While holding the Shift Key in Key Mode, you can engage with the transposition features.
The LED will display the current root note, defaulted to C. Pressing the OCT keys will offset this root note by one semi-tone in either direction.
Alternatively, you can enter the desired root on the keyboard. This new note effectively becomes the new middle C. This ignores octave transposing and wraps around the first octave of the keyboard.
Octave and transpose settings are retained for each of the four voices.
Preset Mode
In Preset mode, the 24 keyboard keys each represent a preset.
Saving and Recalling Presets
Snap
- Captures a snapshot of the Active State Buffer on the Targeted Voice, provided you are in an Anchored State.
- Each Voice maintains its own Snap Buffer per session.
- While holding Print, select a preset slot to immediately save the Snap buffer to that slot. This will permanently overwrite anything on that slot and this becomes the active slot.
- You can Print to multiple slots in rapid succession.
Launch
- Pressing any preset key audibly launches it and it becomes the Active Preset.
- The Active Preset LED will be lit. User populated presets will be dimly lit and empty presets will be unlit.
If the Perkons is recording or if you are holding a sequencer step, Recalling Presets will be entered in as a Gesture Recording or a Parameter Lock.
Ex. You can audition multiple presets in rapid succession and quickly enter them as Parameter Locks into the Perkons sequencer or record them live as the sequence is playing.
Presets should be viewed like invisible hands twisting all of the knobs and switches of a Perkons Voice. All behaviors native to the Perkons remain. You would absolutely lose the previous settings you had the moment you start twisting knobs or Launching Presets.
Copying Presets
Copying a preset to a new location to make iterative changes on it, for instance, is an intended and routine workflow. It is important to understand the operational flow of Vetra in order to have a good time, and this common action is a good place to zoom in.
To recap: Launching a Preset immediately adjusts the Perkons parameters to match those stored settings. Pressing Snap copies those settings into the Snap Buffer. Print lands those onto a preset slot which becomes the new Active Preset.
Ex. Launch Preset. Tweak cutoff. Snap. Holding Print select the next Preset. Tweak Cutoff. Snap. Holding Print select the next Preset… and so on.
This can be done in rapid succession with ease, albeit accompanied by a cacophony of clicky button presses. This is, however, an intended feature.
Preset Mode — Shift Held
While holding the Shift Key in Preset Mode, the keys change functionality in a number of ways. I will only address the features relevant to Presets as the Modifier Layer will be covered in a dedicated section.
Silent Select
Selecting a Preset still launches it but without the Note On midi message.
Bank
The Voice Select buttons instead select the active bank 1–4. The active bank LED will be lit.
Lock
Toggles locking of the Active Preset to prevent overwrite.
Init
Holding Init for 3 seconds will revert the Active Preset to an Initialized state.
Vetra ships with all Preset slots "Empty", or Initialized. These are actually premade presets with all CC values at 0 and special LED rules to remain unlit. These will still Launch just like any other real preset and become the current Active Preset.
Modifiers
The Modifiers are each methods of varying the Active State Buffer in various unique ways.
These are intended as tools to help you arrive at sounds you wish to save as presets or enter into the Perkons sequencer. None of the Modifier or Morph routing is saved in any way and reverts to default behavior per session.
Direct Value Edit
DVE is a tool for addressing a single parameter in a discrete way. If your patch is close to perfect but you need to adjust Tune or VCF by 1 value, this is the tool to do so.
Accessed by holding Shift within Preset Mode and engaging with the corresponding keys.
Target
Tap the Target Key in the DVE section of the panel. Select a single target from the Parameter Select Keys.
Nudge / Shove
Either Nudge or Shove will be engaged when you first engage with the DVE Target.
- Nudge sets the adjustment amount to 1 unit.
- Shove sets the adjustment amount to 12 units.
INC / DEC
Increases or Decreases the targeted parameter by the selected adjustment amount.
Scramble
Scramble is a destructive randomization function capable of addressing parameters at once by small or large amounts.
Accessed by holding Shift within Preset Mode and engaging with the corresponding keys.
Target
Tap the Target Key in the Scramble section of the panel. Select any number of targets from the Parameter Select Keys.
Nudge / Shove
In the case of Scramble, Nudge and Shove are the action buttons as well as the adjustment amount.
- Nudge randomizes selected Parameters by up to 6%
- Shove randomizes selected Parameters by up to 99%
Realtime Morphing
Interpolate between 4 independent Parameter states of the targeted voice in real time. This interpolated value becomes the Active State Buffer saved as Presets or used in other operations.
Seeding Vectors
Each Vector has a dedicated button used for Seeding, or assigning the initial state of parameters to be used in interpolation.
Left, Right, Up, Down.
Hold one of these buttons and select a Preset location. This seeds that vector with the settings saved to the preset.
Additionally, you can select the Snap button to Seed directly from the Snap Buffer without needing to save a preset.
Note: The Snap Buffer copies directly from the Active State Buffer which the Interpolated output of the 4 Vector Buffers drives directly. This means you can be anywhere mid-morph, capture that sound with Snap, and then quickly set this as one of the dedicated corners of your Vector.
Editing the Vectors
Because each of the 4 Vectors is actually its own buffer and merely seeded with parameter settings, they can be edited independently without disrupting or breaking any presets used in their creation.
Moving the Joystick fully towards any of the 4 buffers allows you to adjust that buffer in isolation. You can then adjust any of the parameters via the knobs onboard the Perkons, the DVE or the Scramble, which instead of writing to the Active State Buffer, now writes to the targeted Vector Buffer.
Morphing Functions
On/Off
Hold Left + Down Vector to turn Morphing on and off.
Morphing will not work until you have assigned at least one Vector pair.
RND
Holding the Right + Up Vector buttons assigns presets to all 4 Vectors, ignoring Init or empty presets.
Clear
Holding the Up + Down Vector buttons clears all 4 Vectors.
Core Concepts
Voice
Vetra only addresses one Perkons Voice at a time which is selected and displayed with the Voice Buttons. There is no cross-voice behavior on Vetra.
Some settings will be remembered per Voice within a session and others will not.
Anchored State
We do not have the ability to learn the state of the Perkons midi CCs without first interacting with them. When we have interacted with all of the possible CCs of a voice, this is considered to be an Anchored State.
Is achieved by
- Engaging with all possible CCs of a voice.
- Launching any Vetra Preset (satisfies the above requirement.)
Is broken by
- Power Cycling the Perkons
- Loading a Kit from the Perkons
Consequences
Without putting the Vetra into this Anchored State we are not reliably able to Snap our current settings without potential error.
Because of this, to engage with Vetra's Preset saving and Modifiers, it is simply recommended to start any session from a Vetra preset.
Active State Buffer
The Active State Buffer is the live mirror of every Perkons Voice Parameter setting once an Anchored State is achieved.
- Moving knobs on the Perkons will update this buffer.
- Using the Modifiers on the Vetra will modify this buffer.
- Snap grabs a copy of this buffer.
Session
When you turn on the Perkons / Vetra, you are in a session. Some items are saved between sessions but many are not.
Devlog
Stages of work
Layout Design
Feature Validation
Electronics
Embedded Software
Enclosure Design & Fab
This log will be a chronological timeline of meaningful milestones. I will likely hop around these stages as I move through the project, but I am defining them up front to help me keep organized.
Early Layout Design
Earliest render mock ups.
Landed on 17” x 3.5” tall panel.
Spec matching PB-86 switches.
Added Scramble and Direct Value edit Modifiers.
Changed names a few times, ultimately landing on Vētra, the Latvian word for Storm.
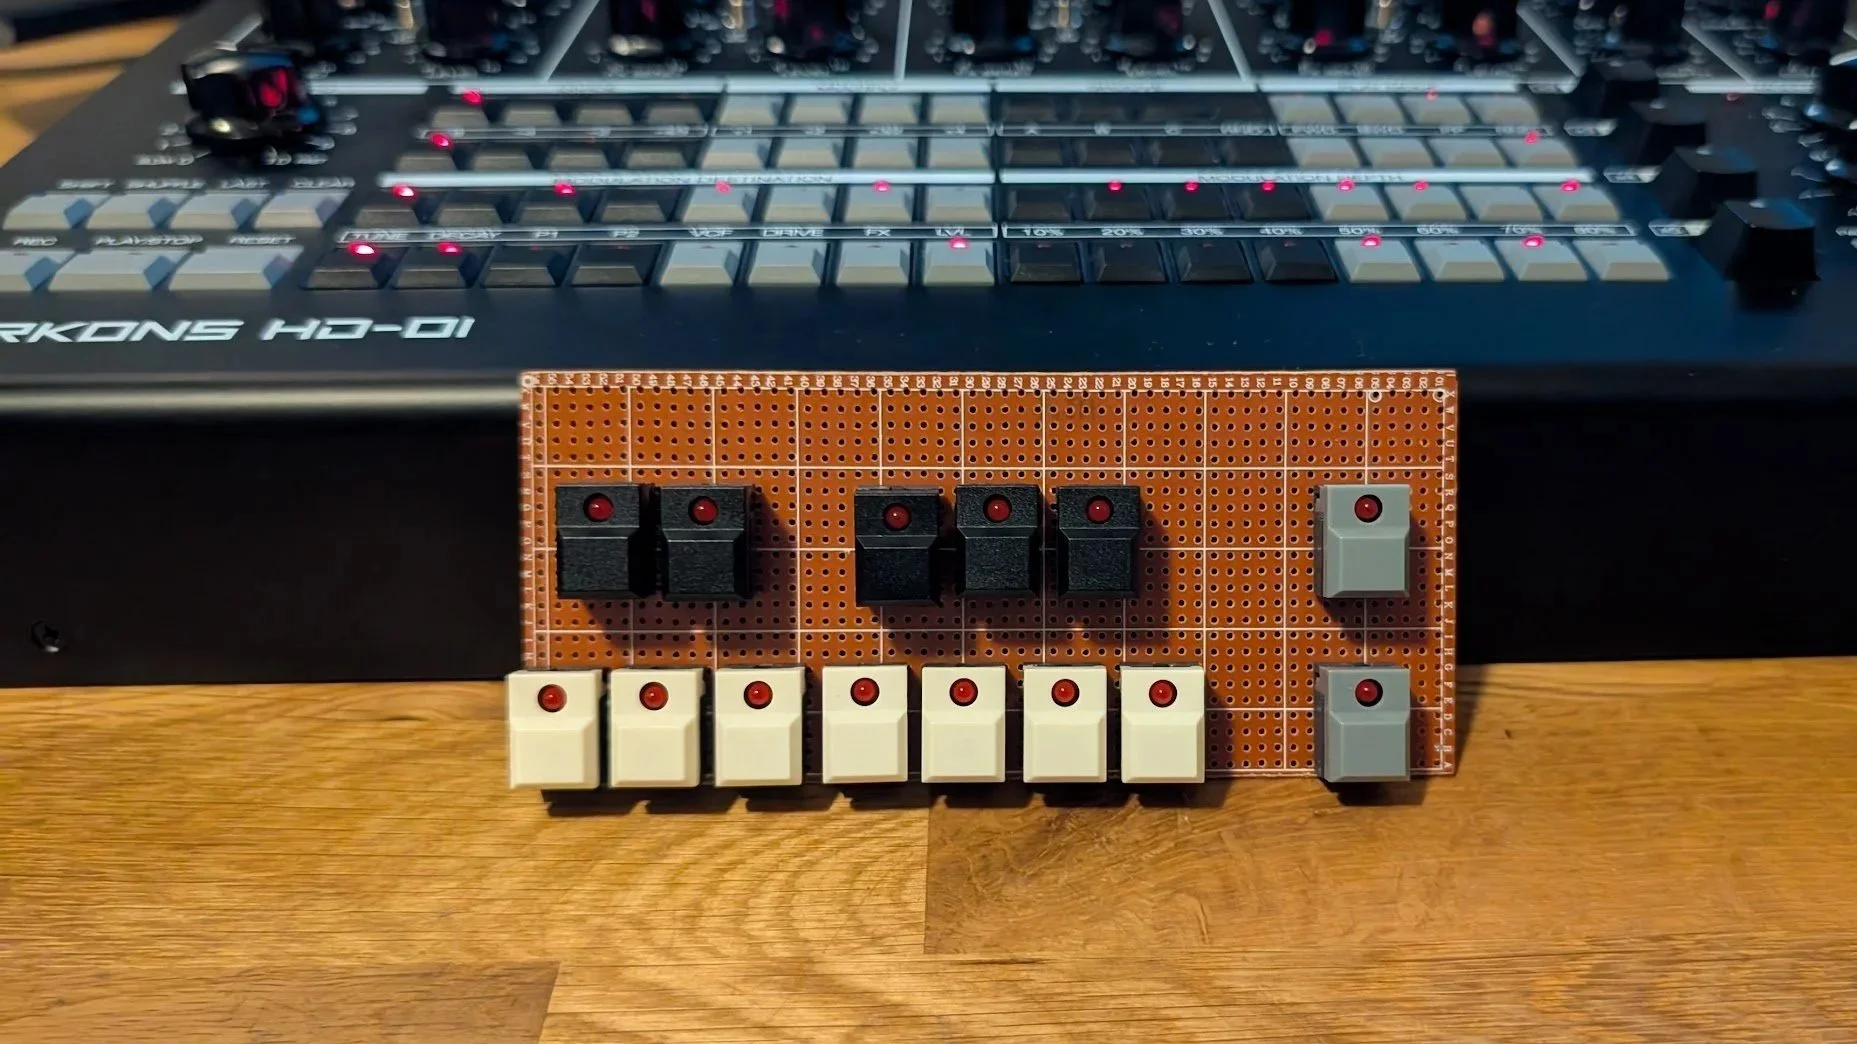
Purchased switches.
This was a minor step in the grand scheme of things, but I wanted the project to feel real at this early stage to keep motivated.
And ordering $65 worth of hardware basically ensures you’re going to finish the project. Right?
I ordered enough to cover some future projects I have planned because I’m fond of this switch style.
Core Feature Validation.
Validated some core midi abilities of the Perkons by sending some test scenarios to it. Used the SendMidi, ReceiveMidi Homebrew utilities for this.
Learned early on I could not poll parameter states from the Perkons, only the state of the knobs and switches once we move them.
This informed major design decisions and I’m glad I worked through this stage early.
Scrapped Concept
Started exploring PCB design in KiCad
Worked through but ultimately scrapped an early concept of the keyboard being it’s own modular unit I could use in future projects.
I intended to pin out all possible connections from switches and LEDs for future proofing. Learned about LED Drivers and I/O expanders and promptly trashed that idea.
Decided that I would revisit a modular keyboard Dev PCB with these switches after Vetra with more experience under my belt.
Electronics Chosen
After drawing hundreds of PCB traces manually, I learned that working from a schematic was easier.
Made several key hardware choices
Microcontroller: RP2040 (brain)
I/O Expander: MCP23017 (for switches)
LED Driver: IS31FL3731-SALS2-TR (LEDs)
Still need to figure out
Power input
Exact midi I/O needs
Decoupling caps?
Rough PCB Footprint Layout
Remade the panel layout on a real 100 mils grid that will translate directly to PCB and sheetmetal fab / silkscreen. (Previous layouts were essentially just a sketch)
Started generally laying out ICs, the MCU and I/O
Thought a bit more about power.
Going to use the LM2596S-3.3v BuckDown Regulator and piggy back off the Perkons own PSU.
Regulator will pcb mounted but power cables ran through a channel routed into the right side wood up near the Perkons PSU.
A jumper barrel cable will connect Perkons to my unit, and an additional single barrel input for the will serve as the only needed power input for both units.
New Feature! MORPHING
Removed Velocity knob, added Morph Joystick.
Intended feature set finalized.
Wrote the User Guide as a sanity check to make sure the UI / UX was still making sense.
Morphing was something I considered early in the project but thought it would be too complicated to implement.
As I began to map the architecture and approach I would take with the firmware, I realized it would not be that difficult to add.
It’s likely to end up being the stand out feature of Vetra.
Rough Firmware Architecture
This came together in tandem with finalizing the morphing concept and writing the manual.
While I haven’t started any software in earnest, I wanted to do my best to map out the core functions and features in a way I felt would translate to the code structure.
I’ll be using MicroPython to program the 2040 Micro Controller. I’ve done some basic scripting in Python and C++ but this will likely be my biggest knowledge gap on the project.